
Rinnai is a highly famous Japanese brand who is producing top-notch tankless water heaters for a long time! They have several tankless models in the market. Do you own a Rinnai tankless water heater? And looking forward to knowing more about it?
You will get everything right in this very article! From adjusting the temperature to flushing and resetting, I have covered everything you will need to know! So without wasting any more time, let’s get to it.
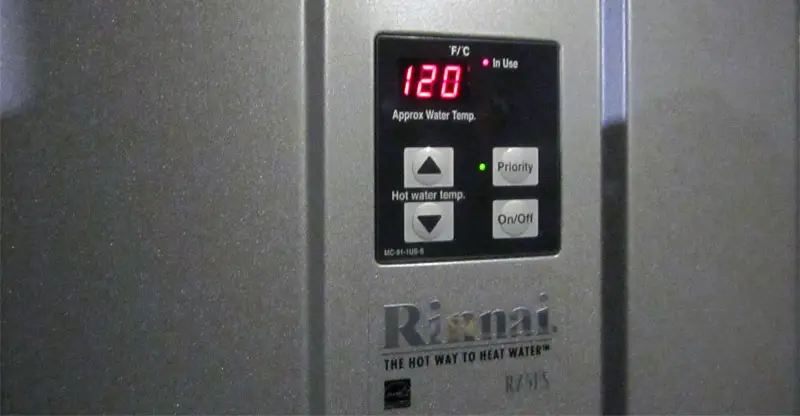
How to Adjust Temperature on the Rinnai Tankless Water Heater?
At the beginning of this year, my tank water heater started irritating me by poor water quality and ineffective heating! That is what caused me to replace the old water heater and I should mention, that the tank water heater lasted for 7 years, that’s huge!
However, I planned to go for a tankless this time and have chosen the Rinnai R75LS water heater. I must say, it is an outstanding water heater! I did all the installation by myself and the process was smooth! It was going good but after a while, I noticed that the temperature doesn’t go above 120 degrees!
120-degrees is reasonably hot, but I needed more hot water for some heavy-duty cleaning. So I did little research and have found out that 120-degrees is the default maximum temperature, but it can be increased. I also found out that the temperature can reach to maximum 140-degrees.
I read the instruction manual that comes with the purchase and that wasn’t so helpful. And then I had to go to a friend who is experienced in such a field, and he helped me with all the information. Finally, I was able to do that!
Here is how I did that!
Remove the Heater Cover
I turned off the heater first and did remove the cover. For removing the cover, you will see four plastic tabs at the four corners of the heater and when you pull them, you will see screws underneath. Yes! You have guessed it right, with a screwdriver unscrew them and remove the cover.
Flip the Dip Switch
Right after removing the cover, I got so confused since there were so many wires and switches. And didn’t know what is the dip switch. When I was losing hope, and almost gave up, I saw a diagram at the back of the cover. And that is what lead me to the dip switch.
When you will remove the cover at the lower right down side behind a plastic you will see 1 to 8 switches in a row and that is called dip switch. In order to increase the temperature, you have to flip the 6 no dip switch. And there were a lot of wires, I didn’t put my entire hand and did it with the finger.
Put the Cover Back
Once you have flipped the dip switch, now screw the cover back. And start the heater! Do not hurry, after you turn on the heater, give it some time and then try to increase the temperature! After screwing the cover, I kept the heater on for 5 minutes at a moderate temperature and then slowly increased it. And Bingo! It touched 140-degrees!
Indoor Natural Gas Tankless Water with a Twin Pipe by Rinnai
Rinnai has developed a natural gas-based water heater. It offers you a condensing technology that is always one step ahead in this industry. This tankless water gives you the benefits of a tank with more efficiency than ever.
Thanks to its design, you can save space, and it will allow you to install it indoors. You will have a natural gas terminal efficiency of 95%. It will enable you to have the standard electronic ignition of NOx emissions of California and Texas. You will be 18.5 inches wide, 26 ” tall, and 10 inches deep.
You will have a consumption of 9.8 gallons of water available in your tankless. It gives you an energy star certification to provide you with greater credibility in the industry. It allows you up to 120 volts and has an MC-91-2US controller.
In addition, it gives you a 12-year warranty on heat exchangers. Plus, 5-year parts warranty, and one year for the residential installation labor.
This unit will give you total silence when using it. You will have unlimited water with the large capacity of this tankless. The temperature always remains constant and does not make sudden changes. You will save bills with large amounts of money for the use of your heater.
SPECIFICATIONS
- Manufacturer: Rinnai
- The item model is RUC98iN
- It is a twin pipe size
- Its voltage is of 120 volts
FEATURES
- No need batteries to work
- It has an Energy Star certification
- You will have a water consumption capacity of 9.8 gallons
- It is designed for indoor use
PROS
- It offers you a residential guarantee divided into several phases.
- It includes a water heater as an additional component.
- It includes an MC-91-2US controller.
- The type of fuel that will be used is natural gas.
- It gives you the option of concentric or PVC ventilation
CONS
- The water heater may not be as hot as you want it to be.
Also Read: Bradford White Water Heater
How to Flush a Rinnai Tankless Water Heater?
Flushing Rinnai tankless water is so simple, only when you know the right trick! And I am going to share the trick I have used to flush my Rinnai R75LS tankless water heater! Here you go!
Needed Items
- Submersible pump.
- Two flexible garden hose.
- A big bucket (5-gallon).
- 4-gallon White vinegar.
Step 1
Before cleaning the water heater, you have to disconnect it from electrical power. You have to remove the access panel as well and with a non-contact voltage tester make sure that all power has been disconnected completely.
Step 2
In order to prevent cold water from entering your house plumbing system close both the cold and hot shut off valves. And then open the hot water pressure relieve valve to relieve the pressure. Be careful doing that, it will release hot water.
Step 3
Take two flexible garden hose (A, B). And attach one end of the A hose with the cold water service port and then attach the other end of hose A to the submersible pump. And place the submersible pump into the bucket.
Step 4
Now attach one end of hose B with hot water service port and put the other end into the bucket where the submersible pump is.
Step 5
Pour the entire bucket with 4-gallon of white vinegar and do not dilute it. Now open both the hot and cold service ports and turn the submersible pump on. The vinegar will go inside the heater and will come back to the bucket. This process should be on the loop for at least 1 hour. It will flush out all the dirt.
Step 6
After one hour, now time to clean the vinegar from the heater and to do that you would want to place one end of the hose B into another bucket where the vinegar will be drained. And also remove the hose A and turn the cold water service port off.
Step 7
Open the cold water shut-off valve, by doing that, fresh water will take out all the remaining vinegar from the heater and will drain through the end of hose B.
Frequently Asked Questions
Ques: How to reset Rinnai tankless water heater?
– In order to reset the Rinnai tankless water, you would have to unscrew the cover and there will be a switch inside the panel. All Rinnai heater covers come with a diagram attached at their back, follow that and you will find where the reset key is placed!
Ques: How to do Rinnai tankless water heater installation?
– Different Rinnai tankless heater models require different types of installation. So the best advice I can give you is to follow the user manual. And if the user manual doesn’t help, surf the internet and check the manufacturer website or visit Rinnai water heater forums, you will get the right information.
Read more about Rinnai Tankless Water Heater.
Wrap Up…
These are the major information’s that most Rinnai tankless water heater owners look for! I have tried to give accurate information in easiest ways, hope it worked!